Angular Course
What are Input and Output in Angular?
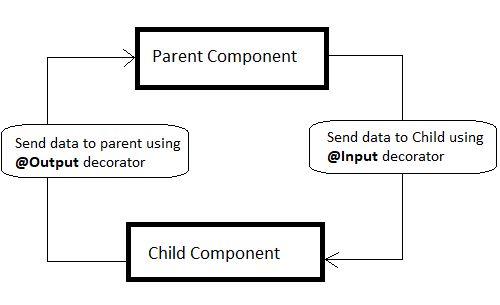
Think of Input and Output as a way for different parts of a web app to talk to each other. Input allows one part to receive data, while Output allows it to send data out. It's like passing notes in class, ensuring everyone gets the message!
Building Blocks of Interaction!
Imagine a web app as a collection of Lego blocks. Each block (or component) has its own job, but to build something awesome, they need to work together. Input and Output are the connectors that make sure these blocks interact smoothly.
Input: Receiving Data
Input is like an inbox for a component. It receives data from its parent component, allowing it to display or process that information. For example, a user profile component might receive the user's name and picture to display.
Output: Sending Data
Output works like a megaphone, broadcasting data from one component to its parent. This is useful for actions like sending a user's form input back to the main app for processing, like submitting a contact form.
Enhancing User Experience!
By using Input and Output, Angular apps can update and respond to user actions instantly. This means a more dynamic and responsive experience – like instant feedback when you fill out a form or interact with a dashboard.
Keeping It Organized!
Input and Output help keep the code organized and modular. Each component does its own job but can still communicate efficiently with other components, making the app easier to manage and expand.
Practical Example!
Think of an online shopping cart. The cart component (parent) sends product details to a product component via Input. When a user adds an item to the cart, the product component sends the action back to the cart via Output. Everything works together harmoniously!
Component Communication with Input property from Parent to Child Component
Input Properties: Input properties allow us to pass data from a parent component to a child component. We can bind these properties in the child component's class and use them to display dynamic content in the child component's template.
Example:
Parent Component TypeScript:
import { Component } from '@angular/core';

@Component({
 selector: 'app-parent',
 template: `
 <app-child [message]="parentMessage"></app-child>
 `
})
export class ParentComponent {
 parentMessage = 'Message from parent component';
}
Here, we use the <app-child> tag to include the child component in the parent's template. We bind the parentMessage property of Parent Component to the message input property of Child Component using property binding [message]="parentMessage".
Child Component TypeScript:
import { Component, Input } from '@angular/core';

@Component({
 selector: 'app-child',
 template: `
 <p>{{ message }}</p>
 `
})
export class ChildComponent {
 @Input() message: string;
}
We define an input property message using the @Input() decorator. This property will receive the value passed from the parent component. Here, we use interpolation {{ message }} to display the value of the message property passed from the parent component.
Component Communication with Output property from Child Component to Parent Component
Output Properties and Event Emitters:
Output properties allow a child component to emit events to notify its parent component about changes or actions. We can define custom events using output properties and emit values from the child component.
Example:
Child Component Typescript file
mport { Component, Output, EventEmitter } from '@angular/core';

@Component({
 selector: 'app-child',
 template: `
 <button (click)="sendMessage()">Send Message</button>
 `
})
export class ChildComponent {
 @Output() messageEvent = new EventEmitter<string>();

 sendMessage() {
 this.messageEvent.emit('Message from child component');
 }
}
We declare an output property 'messageEvent' using the @Output() decorator. This property is of type EventEmitter<string>, which emits events of type string. It will be used to notify the parent component about changes or actions.
sendMessage() { ... }: This method is called when the button in the template is clicked. Inside the method, we call this.messageEvent.emit('Message from child component') to emit an event with the message 'Message from child component'. This event will be captured by the parent component.
Parent Component Typescript file
import { Component } from '@angular/core';

@Component({
 selector: 'app-parent',
 template: `
 <app-child (messageEvent)="receiveMessage($event)"></app-child>
 <p>{{ receivedMessage }}</p>
 `
})
export class ParentComponent {
 receivedMessage: string;

 receiveMessage(message: string) {
 this.receivedMessage = message;
 }
}
Here, we include the child component <app-child> and listen for the messageEvent output property emitted by the child component using the event binding (messageEvent)=receiveMessage($event). When the event is emitted by the child component, it triggers the receiveMessage() method in the parent component.
We declare a property 'receivedMessage' to store the message received from the child component. The method 'receiveMessage(message: string)' is called when the messageEvent output property emitted by the child component is triggered. It receives the message emitted by the child component as a parameter and assigns it to the 'receivedMessage' property of the parent component.
Using @ViewChild, @ViewChildren, @ContentChild, and @ContentChildren for accessing child components and DOM elements
Exploring @ViewChild decorator
This decorator is used to get reference to a component instance by querying the template using the component reference name or class name. It returns the first matching component.
Example:
Child Component Typescript
import { Component, Input } from '@angular/core';

@Component({
selector: 'app-message',
template: `<h2>{{message}}</h2>`
})

export class MessageComponent {
@Input() message: string;
}
An input property message using the @Input() decorator is defined. It allows the parent component to bind data to this property.
Parent Component Typescript
import { Component, OnInit } from '@angular/core';

@Component({
selector: 'app-root',
template: `
<div>
<h1>Messages</h1>
<app-message [message]='message'></app-message>
</div>`
})

export class AppComponent implements OnInit, AfterViewInit {
message: any;
@ViewChild(MessageComponent) messageComponent: MessageComponent;

ngAfterViewInit() {
console.log(this.messageComponent);
this.messageComponent.message = 'Passed as View Child';
}

ngOnInit() {
this.message = 'Hello World !';
 }
}
Here, we have a <div> element containing an <app-message> tag. We bind the message property of the parent component to the message input property of the child component using property binding [message]='message'.
@ViewChild decorator is used to query for the MessageComponent instance in the parent component's template. It assigns the reference to the 'messageComponent' property.
ngAfterViewInit() { ... }: This method is called after the view of the parent component has been initialized. Inside this method, we access the messageComponent reference and set its message property to 'Passed as View Child'.
ngOnInit() { ... }: This method is called when the parent component is initialized. Inside this method, we initialize the message property with the value 'Hello World !'.
Why dont we change the value of MessageComponent inside ngOnInit()?
ngOnInit() initializes component properties and fetches data. It runs after the constructor, before the view is fully initialized.
ngAfterViewInit() runs after the view is fully initialized. It's suitable for accessing child components or manipulating the DOM. In this case, setting this.messageComponent.message is safer in ngAfterViewInit() to ensure the child component is fully ready to receive data.
Exploring @ViewChildren decorator and comparision with @ViewChild decorator'
@ViewChild: It is used to query for the first element or component matching the selector from the view or component template. It is used to get a reference to a single element or component in the view. It returns the first matching element or component. If multiple elements match the selector, it returns the first one found.
@ViewChildren: It is used to query for multiple elements or components matching the selector from the view or component template. It is used to get references to multiple elements or components in the view in form of QueryList of all matching elements or components. If no elements match the selector, it returns an empty QueryList.
Example
Child Component Typescript
import { Component, Input } from '@angular/core';
@Component({
selector: 'app-message',
template: <h2>{{message}}</h2>
})
export class MessageComponent {
@Input() message: string;
}
Parent Component Typescript
import { Component } from '@angular/core';
@Component({
 selector: 'app-parent',
 template: `
 <div>
 <h1>Messages</h1>
 <app-message *ngFor="let message of messages" [message]="message"></app-message>
 </div> `
})

export class ParentComponent {
 messages: string[] = ['Message 1', 'Message 2', 'Message 3'];
@ViewChildren(MessageComponent) messageComponent: QueryList<MessageComponent>;

ngAfterViewInit() {
console.log(this.messageComponent); //various references of MessageComponent as ViewChildren in QueryList

this.messageComponent.forEach((item) => { item.message = 'Hello World'; });
//updating the properties
 }
}
But you will get the error, 𝘌𝘹𝘱𝘳𝘦𝘴𝘴𝘪𝘰𝘯 𝘩𝘢𝘴 𝘤𝘩𝘢𝘯𝘨𝘦𝘥 𝘢𝘧𝘵𝘦𝘳 𝘪𝘵 𝘸𝘢𝘴 𝘭𝘢𝘴𝘵 𝘤𝘩𝘦𝘤𝘬𝘦𝘥. if you update the property inside ngAfterContentInit().
You can fix it by manually calling change detection like ViewChild. Keep in mind that we do not have ViewChildren reference available in AfterContentInit life cycle hook. You will get undefined in ngAfterContentInit() life cycle hook for ViewChildren reference.
However, you can manually call change detection to fix error.
Import ChangeDetectorRef from @angular/core;

@ViewChildren(MessageComponent) messageComponent: QueryList<MessageComponent>;

constructor(private cdr: ChangeDetectorRef) {
}

ngAfterContentInit() {
this.messageComponent.forEach((item) => { item.message = 'Hello World'; });
this.cdr.detectChanges();
}
This can be useful in cases where you need to ensure that changes in content are reflected in the view immediately after ngAfterContentInit() is called. However, be mindful of the performance implications of manual change detection and use it judiciously.
Exploring @ContentChildren decorator
It is used to query for multiple elements or components that are projected into the component's view using <ng-content>. It allows us to access these projected elements or components from within the parent component.
Example
Suppose we have a parent component 'TabListComponent' that projects multiple 'TabComponent' instances using <ng-content>. We want to access all the projected 'TabComponent' instances within the 'TabListComponent'.
Tab Component Typescript File (Child Component)
import { Component, Input } from '@angular/core';

@Component({
 selector: 'app-tab',
 template: `
 <div>
 <h4>{{ title }}</h4>
 </div>
 `
})
export class TabComponent {
 @Input() title: string;
}
Tab List Component Typescript File (Parent Component)
import { Component, ContentChildren, QueryList, AfterContentInit } from '@angular/core';
import { TabComponent } from './tab.component';

@Component({
selector: 'app-tab-list',
template: `
<ng-content></ng-content> `
})
export class TabListComponent implements AfterContentInit {

@ContentChildren(TabComponent) tabList: QueryList<TabComponent>;

ngAfterContentInit() {
this.tabList.forEach(tab => console.log(tab.title));
 }
}
- The 'TabListComponent' component has a 'tabList' property decorated with 'ContentChildren(TabComponent)'. This property will hold all the projected 'TabComponent' instances.
- In the 'ngAfterContentInit' lifecycle hook, we iterate over the 'tabList' and log the title of each 'TabComponent' instance.
Tab List Component HTML File
<app-tab-list>
 <app-tab [title]="'Tab 1'"></app-tab>
 <app-tab [title]="'Tab 2'"></app-tab>
 <app-tab [title]="'Tab 3'"></app-tab>
</app-tab-list>
Output
Tab 1 Tab 2 Tab 3