Angular Course
What are Lifecycle Hooks in Angular?
A component from creation to destruction goes through several stages and these stages are the life cycle hooks.
The stages covering activities like
- Component instantiating.
- Rendering the component html view.
- Creating the child components(if required).
- Destroying the component.
Here with the Hooks provided by the Angular.
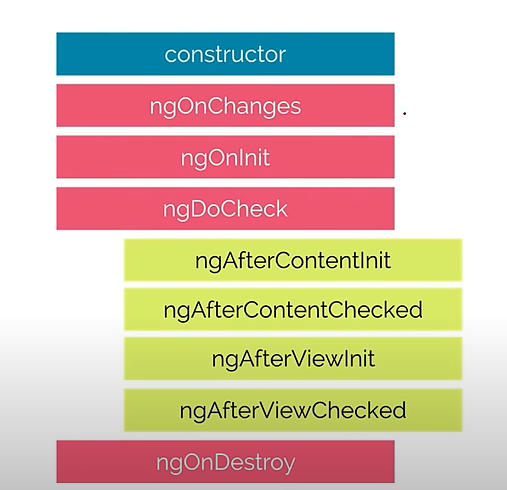
- Constructor It is a default method of the typescript class that is executed when the class is instantiated. It always run before any angular hook and it is not part of Lifecycle hooks. It is widely used to inject dependencies(services) into the component class.
- ngOnChanges It is called whenever one or more input properties of a directive or component change. This hook provides access to both the previous and current values of the input properties, allowing you to respond to changes and perform any necessary actions.
- ngOnInit It is called once after Angular has initialized all data-bound properties of a directive or component. This hook is commonly used for initialization logic that depends on input values.
- ngDoCheck It is called during every change detection cycle and allows you to implement custom change detection logic. It is commonly used for optimizing performance or detecting changes in complex data structures.
- ngAfterContentInit It is called after Angular has projected external content into the component's view. It is commonly used for initialization logic related to projected content.
- ngAfterContentChecked It is called after Angular has checked the projected content for changes. It is commonly used for detecting changes in projected content or interacting with child components.
- ngAfterViewInit It is called after Angular has initialized the component's view and child views. It is commonly used for initialization logic related to the component's view.
- ngAfterViewChecked It is called after Angular has checked the component's view and child views for changes. It is commonly used for detecting changes in the component's view or interacting with child components.
- ngOnDestory It is called when Angular is about to destroy the component. It is commonly used to perform any necessary cleanup, such as unsubscribing from observables, detaching event handlers, or clearing timers to prevent memory leaks.
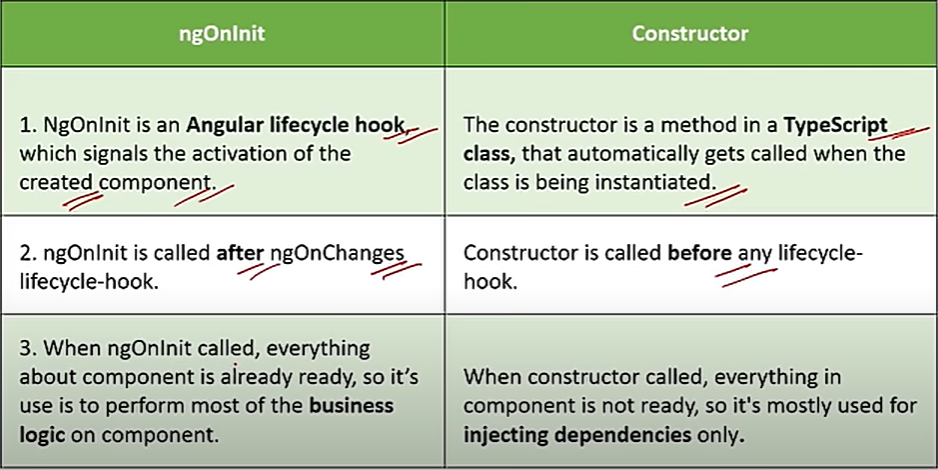
What is the difference between Constructor and ngOnInit?
Example for ngOnInit Hook
Suppose we have a component called 'UserComponent' that receives a user object as an input and needs to perform initialization logic based on this input. We can utilize the 'OnInit' hook to execute this logic.
import { Component, Input, OnInit } from '@angular/core';
@Component({
selector: 'app-user',
template: `
<div>
<h2>Welcome, {{ user.name }}!</h2>
<p>Email: {{ user.email }}</p>
</div> ` })

export class UserComponent implements OnInit {
@Input() user: any;
ngOnInit(): void {
console.log('UserComponent initialized.'); // Perform initialization logic here
} }
In this example, the 'UserComponent' implements the 'OnInit' interface and defines the 'ngOnInit' method. This method is automatically called by Angular after the component's data-bound properties, such as user, have been initialized.
Note: If we try to print the 'user' value in the 'ngOnInit' method, it will be printed as 𝘶𝘯𝘥𝘦𝘧𝘪𝘯𝘦𝘥. This is because the 'ngOnInit' method is called after Angular has initialized all data-bound properties of the component, but before the component receives any input values from its parent component or template. In this case, the 'user' property is declared as an @Input, indicating that it is bound to a property in the parent component's template. However, the value of user is assigned by the parent component, and this assignment occurs after the 'ngOnInit' method is called. To access the user value inside the 'ngOnInit' method, you would need to ensure that it is provided by the parent component or template before the 'UserComponent' is initialized.
Example for ngOnChange Hook
Suppose we have a component called 'UserProfileComponent' that receives a user object as an input and needs to perform certain actions when the user's details change. We can utilize the OnChanges hook to detect these changes and react accordingly.
import { Component, Input, OnChanges, SimpleChanges } from '@angular/core';
@Component({
selector: 'app-user-profile',
template: `
<div> <h2>User Profile</h2>
<p>Name: {{ user.name }}</p>
<p>Email: {{ user.email }}</p>
</div> `
})

export class UserProfileComponent implements OnChanges {
@Input() user: any;
ngOnChanges(changes: SimpleChanges): void {
console.log('Input properties changed:', changes);
if (changes.user) {
console.log('User details changed:', changes.user.currentValue); // Perform actions based on the new user details...
} } }
In this example, the 'UserProfileComponent' implements the OnChanges interface and defines the 'ngOnChanges' method. This method is automatically called by Angular whenever the value of an input property, in this case, user, changes.
// Assuming the value of the user input property changes from the parent component
// Previous user object
{
 currentValue: { name: 'John Doe', email: 'john@example.com' },
 previousValue: undefined, // If it's the first change, previousValue will be undefined
 isFirstChange: true // Indicates whether it's the first change or not
}

// Current user object
{
 currentValue: { name: 'Jane Smith', email: 'jane@example.com' },
 previousValue: { name: 'John Doe', email: 'john@example.com' },
 isFirstChange: false // It's not the first change anymore
}
Output
Input properties changed: {
 user: {
 currentValue: { name: 'Jane Smith', email: 'jane@example.com' },
 previousValue: { name: 'John Doe', email: 'john@example.com' },
 isFirstChange: false
 }
}
User details changed: { name: 'Jane Smith', email: 'jane@example.com' }
Example for ngDoCheck Hook
Suppose we have a component called 'UserListComponent' that displays a list of users and needs to perform certain actions when the list of users changes. We can utilize the DoCheck hook to detect changes to the list of users and react accordingly.
import { Component, Input, DoCheck } from '@angular/core';
@Component({
selector: 'app-user-list',
template: `
<div>
<h2>User List</h2>
<ul>
<li *ngFor="let user of users">{{ user.name }}</li>
</ul>
</div> `
})

export class UserListComponent implements DoCheck {
@Input() users: any[];
previousUsers: any[];

ngDoCheck(): void {
if (this.users !== this.previousUsers) {
console.log('User list changed:', this.users);
this.previousUsers = this.users;
} } }
In this example, the 'UserListComponent' implements the DoCheck interface and defines the ngDoCheck method. This method is automatically called by Angular during every change detection cycle. Inside the ngDoCheck method, we compare the current list of users (this.users) with the previous list of users (this.previousUsers). If the lists are not equal, it indicates a change, and we can perform any necessary actions based on the new user list.
𝗕𝗲𝗻𝗲𝗳𝗶𝘁𝘀 𝗼𝗳 𝗨𝘀𝗶𝗻𝗴 𝗗𝗼𝗖𝗵𝗲𝗰𝗸:
- 𝘊𝘶𝘴𝘵𝘰𝘮 𝘊𝘩𝘢𝘯𝘨𝘦 𝘋𝘦𝘵𝘦𝘤𝘵𝘪𝘰𝘯: DoCheck allows you to implement custom change detection logic tailored to your application's requirements.
- 𝘖𝘱𝘵𝘪𝘮𝘪𝘻𝘦𝘥 𝘗𝘦𝘳𝘧𝘰𝘳𝘮𝘢𝘯𝘤𝘦: By selectively detecting changes and performing actions only when necessary, you can optimize the performance of your application.
- 𝘍𝘪𝘯𝘦-𝘨𝘳𝘢𝘪𝘯𝘦𝘥 𝘊𝘰𝘯𝘵𝘳𝘰𝘭: You have fine-grained control over when and how change detection is performed, enabling you to optimize performance and responsiveness.
𝗡𝗼𝘁𝗲: Use 'DoCheck' when you need to implement custom change detection logic that is not tied to specific input properties.
Use 'OnChanges' when you need to detect and respond to changes in input properties, accessing both previous and current values.
Example for ngAfterContentInit
We'll have a parent component that projects content into a child component.
Child Component (projected content)
mport { Component } from '@angular/core';
@Component({
selector: 'app-child',
template: `<p>{{ text }}</p>` })
export class ChildComponent {
text = 'This is the child component content.';
}
Parent Component
import { Component, AfterContentInit, ContentChild } from '@angular/core'; import { ChildComponent } from './child.component';

@Component({
selector: 'app-parent',
template: `
<div>
<h2>Parent Component</h2>
<ng-content></ng-content>
</div>
` })
export class ParentComponent implements AfterContentInit { @ContentChild(ChildComponent) childComponent!: ChildComponent;

ngAfterContentInit() {
console.log('Content child:', this.childComponent);
this.childComponent.text = 'Updated content from Parent Component';
} }
Root Component
import { Component } from '@angular/core';
@Component({ selector: 'app-root',
template: `
<app-parent>
<app-child></app-child>
</app-parent>
` })
export class AppComponent { }
- Child Component: A simple component displaying a paragraph with some text.
- Parent Component: Uses <ng-content> to project child content. Implements AfterContentInit and uses the @ContentChild decorator to get a reference to the projected child component. In the ngAfterContentInit method, it updates the text property of the child component.
- Root Component: Projects app-child component into app-parent.
Output
When you run this example, the parent component will project the child component content. The ngAfterContentInit hook in the parent component will update the text of the child component after the content is initialized.
𝘊𝘰𝘯𝘵𝘦𝘯𝘵 𝘤𝘩𝘪𝘭𝘥: 𝘊𝘩𝘪𝘭𝘥𝘊𝘰𝘮𝘱𝘰𝘯𝘦𝘯𝘵 { 𝘵𝘦𝘹𝘵: '𝘛𝘩𝘪𝘴 𝘪𝘴 𝘵𝘩𝘦 𝘤𝘩𝘪𝘭𝘥 𝘤𝘰𝘮𝘱𝘰𝘯𝘦𝘯𝘵 𝘤𝘰𝘯𝘵𝘦𝘯𝘵.' }
Example for ngAfterContentChecked Hook
Child Component:
import { Component } from '@angular/core';
@Component({
selector: 'app-child',
template: `<p>{{ text }}</p>` })

export class ChildComponent {
text = 'This is the child component content.';
}
Parent Component:
import { Component, AfterContentInit, AfterContentChecked, ContentChild } from '@angular/core';
import { ChildComponent } from './child.component';
@Component({
selector: 'app-parent',
template: `
<div>
<h2>Parent Component</h2>
<ng-content></ng-content>
</div>
` })
export class ParentComponent implements AfterContentInit, AfterContentChecked {

@ContentChild(ChildComponent) childComponent!: ChildComponent;

ngAfterContentInit() {
console.log('ngAfterContentInit: Content child initialized:', this.childComponent);
this.childComponent.text = 'Updated content from Parent Component after Content Init'; }

ngAfterContentChecked() {
console.log('ngAfterContentChecked: Content child checked:', this.childComponent); } }
Root Component:
import { Component } from '@angular/core';
@Component({
selector: 'app-root',
template: `
<app-parent>
<app-child></app-child>
</app-parent>
` })
export class AppComponent { }
- Child Component: Displays a paragraph with some text.
- Parent Component: Uses <ng-content> to project child content. Implements AfterContentInit and AfterContentChecked interfaces. In the ngAfterContentInit method, updates the text property of the child component after content initialization. In the ngAfterContentChecked method, logs the content child component to the console after each content check.
- Root Component: Projects the app-child component into app-parent.
Output
ngAfterContentInit: Content child initialized: ChildComponent { text: 'This is the child component content.' }
ngAfterContentChecked: Content child checked: ChildComponent { text: 'Updated content from Parent Component after Content Init' } ngAfterContentChecked: Content child checked: ChildComponent { text: 'Updated content from Parent Component after Content Init' }
The ngAfterContentChecked log will appear multiple times as Angular's change detection mechanism triggers checks.
Example for ngAfterViewInit Hook
We'll create a parent component that interacts with a child component once the view is fully initialized.
Child Component:
import { Component } from '@angular/core';
@Component({
selector: 'app-child',
template: `
<p>{{ text }}</p>`
})
export class ChildComponent {
text = 'This is the child component content.';
}
Parent Component:
import { Component, AfterViewInit, ViewChild } from '@angular/core';
import { ChildComponent } from './child.component';
@Component({
selector: 'app-parent',
template: `
<div>
<h2>Parent Component</h2>
<app-child></app-child>
</div>
` })
export class ParentComponent implements AfterViewInit { @ViewChild(ChildComponent) childComponent!: ChildComponent

ngAfterViewInit() {
console.log('ngAfterViewInit: View child initialized:', this.childComponent); this.childComponent.text = 'Updated content from Parent Component after View Init';
} }
Root Component:
import { Component } from '@angular/core';
@Component({
selector: 'app-root',
template: `
<app-parent></app-parent> ` })

export class AppComponent { }
- Child Component: Displays a paragraph with some text.
- Parent Component: Uses the @ViewChild decorator to get a reference to the child component. Implements the AfterViewInit interface. In the ngAfterViewInit method, updates the text property of the child component once the view is initialized.
- Root Component: Contains the app-parent component, which in turn includes the app-child component.
Output
ngAfterViewInit: View child initialized: ChildComponent { text: 'This is the child component content.' }
Displayed Output
Parent Component
Updated content from Parent Component after View Init
Example for ngAfterViewChecked Hook
𝘊𝘩𝘪𝘭𝘥 𝘊𝘰𝘮𝘱𝘰𝘯𝘦𝘯𝘵:
import { Component } from '@angular/core';
@Component({
selector: 'app-child',
template: `
<p>{{ text }}</p>
` })

export class ChildComponent { text = 'This is the child component content.'; }
𝘗𝘢𝘳𝘦𝘯𝘵 𝘊𝘰𝘮𝘱𝘰𝘯𝘦𝘯𝘵:
import { Component, AfterViewInit, AfterViewChecked, ViewChild } from '@angular/core';
import { ChildComponent } from './child.component';
@Component({
selector: 'app-parent',
template: `
<div>
<h2>Parent Component</h2>
<app-child></app-child>
</div> ` })

export class ParentComponent implements AfterViewInit, AfterViewChecked { @ViewChild(ChildComponent) childComponent!: ChildComponent;

ngAfterViewInit() {
console.log('ngAfterViewInit: View child initialized:', this.childComponent); this.childComponent.text = 'Updated content from Parent Component after View Init'; }

ngAfterViewChecked() {
console.log('ngAfterViewChecked: View child checked:', this.childComponent); } }
𝘙𝘰𝘰𝘵 𝘊𝘰𝘮𝘱𝘰𝘯𝘦𝘯𝘵:
import { Component } from '@angular/core';
@Component({
selector: 'app-root',
template: `
<app-parent></app-parent>
` })

export class AppComponent { }
Output
ngAfterViewInit: View child initialized: ChildComponent { text: 'This is the child component content.' }
ngAfterViewChecked: View child checked: ChildComponent { text: 'Updated content from Parent Component after View Init' }
ngAfterViewChecked: View child checked: ChildComponent { text: 'Updated content from Parent Component after View Init' }
The ngAfterViewChecked log will appear multiple times as Angular's change detection mechanism triggers checks.
Displayed Output
Parent Component
Updated content from Parent Component after View Init