Spring Boot Course
Spring Inversion Of Control - Ioc
Spring IOC container is used for creating and injecting dependencies automatically.
Spring IOC
- creates the objects
- wire them together
- configure them
- Manage their complete lifecycle from creation till destruction
- Uses dependency injection to manage the components that make up an application
In Spring we have the below containers
-
IOC- BeanFactory and ApplicationContext.
-
MVC Web container developed on top of IOC – WebApplicationContext.
-
BeanFactory(I)
XMLBeanFactory(C);
- ApplicationContext(I)
ConfigurableApplicationContext(I);
ClasspathXMLApplicationContext(C);
FileSystemXMLApplicationContext(C);
AnnotationConfigApplicationContext(C);
- WebApplicationContext(I)
WebApplicationContextUtilFactory(C);
AnnotationConfigWebApplicationContext(C);
Points to remember
- By default bean is singleton i.e.. single object is created even though we call getBean() multiple times.
- If we declare scope as prototype for every request we will get new object.
- Spring can access private constructor also
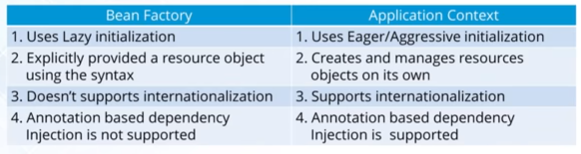
IOC vs DI
IOC(Inversion of Control) -> Giving control to the container to get an instance of the object means instead you creating an object using new operator, let the controller do it for you.
DI(Dependency Injection) -> It is a form of IOC where implementations are passed into an object through constructors/setters which the object will depend on in order to behave correctly.
In Spring Boot, dependency injection (DI) is a core concept that allows you to manage and inject dependencies into your classes without having to manually instantiate them. This decouples the creation of objects from their usage and improves the flexibility, maintainability, and testability of your application. Spring Boot supports three common types of dependency injection:
- Field Injection
- Constructor Injection
- Setter Injection
Field Injection
Field Injection is the simplest and most direct form of dependency injection in Spring. In this approach, dependencies are injected directly into the fields of a class. Spring uses reflection to inject the dependencies when the bean is created.
We need to use @Autowired annotation on top of variables in a class which we need to inject.
Pros:
Simplicity:The syntax is very concise.- No need for explicit constructors or setter methods.
Cons:
Tight coupling:Field injection doesn't make it clear which dependencies the class relies on, as they are not explicitly listed.Difficult to test:In some cases, it can be more difficult to mock the dependencies in unit tests.Harder to maintain:Dependencies are not explicit, making it harder to understand the class's dependencies at a glance.
For example,
@RestController
@RequestMapping("/api/v1")
public class TaskController {

	@Autowired
	private TaskService taskService;

    @GetMapping(value = "/tasks", produces = MediaType.APPLICATION_JSON_VALUE)
	public List<TaskResponse> getAllTasks() {
		return taskService.getAllTasks();

	}
}
Constructor Injection
Constructor Injection is the most recommended way to inject dependencies in Spring, especially for mandatory dependencies. In this method, Spring injects dependencies via the class constructor. The dependencies are explicitly defined as constructor parameters.
Pros:
Immutability:The dependencies are typically final, making them immutable once set.Explicit dependencies:It's clear which dependencies the class requires, improving readability and maintainability.Easier testing:Constructor injection makes it easier to inject mock objects in unit tests.Better design:It's a sign of good design to explicitly declare dependencies in the constructor.
Cons:
Requires more boilerplate:While it is the recommended way, it might require you to define multiple constructors if your class has many dependencies.Not suitable for optional dependencies:If a class has optional dependencies, constructor injection may not be the best choice, as it requires all dependencies to be provided.
For example,
@RestController
@RequestMapping("/api/v1")
public class TaskController {

	private final TaskService taskService;

	public TaskController(TaskService taskService) {
		this.taskService = taskService;
	}

	@GetMapping(value = "/tasks", produces = MediaType.APPLICATION_JSON_VALUE)
	public List<TaskResponse> getAllTasks() {
		return taskService.getAllTasks();

	}
}
Setter Injection
Setter Injection involves injecting dependencies via setter methods. In this approach, Spring will use the setter methods to inject dependencies after the class is instantiated.
Pros:
Flexibility:You can choose which dependencies to inject and when, especially useful for optional dependencies.Easier to test:Like constructor injection, setter injection also allows for easier testing by providing mock dependencies.
Cons:
Not ideal for mandatory dependencies:Since setter methods can be called optionally, it might lead to situations where dependencies are not set, causing potential issues in the application.Mutability:Dependencies are mutable, and this could lead to side effects or make the object state changeable after initialization.More boilerplate:If the class has many dependencies, it can require multiple setter methods, making the class harder to maintain.
For example,
@RestController
@RequestMapping("/api/v1")
public class TaskController {

	private TaskService taskService;

	@Autowired
	public void setTaskService(TaskService taskService) {
		this.taskService = taskService;
	}

	@GetMapping(value = "/tasks", produces = MediaType.APPLICATION_JSON_VALUE)
	public List<TaskResponse> getAllTasks() {
		return taskService.getAllTasks();

	}
}
Comparison
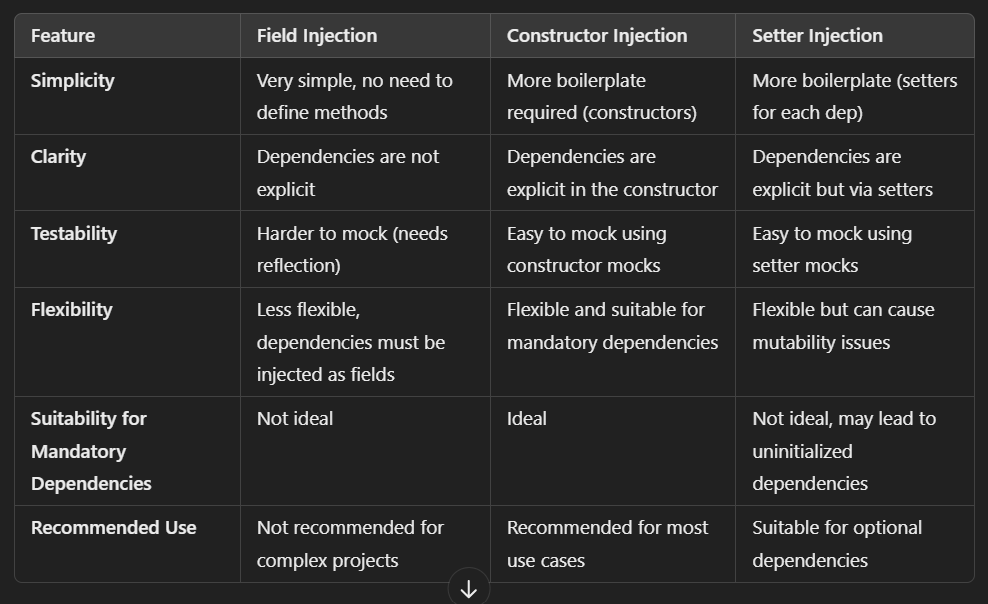
Constructor Injection is favoured over @Autowired(Field Injection) for the following reasons
- It promotes immutability by using final fields.
- It improves testability by allowing you to pass mock dependencies directly.
- It makes dependencies explicit, ensuring that required dependencies are always provided.
- It helps detect circular dependencies early.
- It produces cleaner, more maintainable code.